

How To Set A Drum Set
In this guide, we will testify you how to set up a pulsate gear up. We will walk y'all through assembling stands, installing drumheads, and also positioning your cymbals. Follow the steps below to get started. Nosotros've besides created a video guide with Nick D'Virgillio to aid yous along the style.
- How to install the drumheads
- Assemble drum hardware
- Pulsate throne
- Snare pulsate stand up
- Cymbal stands
- Setting upwards the drum shells
- Setting upwardly cymbals
- Positioning the cymbal stands
- Dial it in
Near drum sets won't accept hoops or drumheads preinstalled, so you need to install and tune the drum shells earlier you lot prepare upward your drum shells. Yous'll have ii heads for each drum: a thick caput and a thin head. Brand sure to place the thicker head on tiptop (batter side) and the thinner head on the bottom (resonant side). Go along below to install the heads onto your drums.
- Lay the drumhead on the beat out. For the bass drum, make sure that the drumhead with the logo on it is installed on the side closest to thebass drum legs.
- Identify the drum hoop over the head and line up the holes from the hoop so they lucifer the position of thelugs.
- About drum hoops take a flat cease and a rounded terminate; make certain the flat end is the 1 that touches the head.
- Identify thetension rods through the holes of the hoop, insert them into the lugs, and finger-tighten them until you lot can't turn the tension rods with your fingers any longer.
- Bass drum tension rods are much longer and volition have hook hooks that you adhere to the hoop.
- Once finger-tightened, use your drum key and tune the heads upwards to pitch, tightening them in the pattern every bit seen in the photo below.
The main purpose for finger-tightening tension rods is and then they all accept equal tension before yous start tightening the drumheads with your pulsate fundamental. If there isn't equal tension when tightening them, you lot could bend the hoop or crusade harm to the trounce!
Drum hardware may look a bit boring and a little complicated to gear up when you first take information technology out of the box, but it's quite simple, so follow these steps to get your pulsate throne, snare stand, and cymbal stands fix.
TIP:Most pulsate manufacturers include spare tension rods, washers, and cymbal felts only in case you need something downwardly the road. So if you end up with some spare parts, keep them handy in your pulsate toolbox.
Your drum throne is the base of your unabridged drum set up. Once you set it upwardly, take some time to arrange the height and find a comfortable sitting position. The general dominion of thumb is to make certain that your thighs are a footling taller than parallel with the flooring when y'all sit. Doing this tin can prevent back and leg fatigue, equally it allows your limbs to residual in a more than natural sitting position and too helps with your playing technique. Follow these steps to ready your drum throne.
- Loosen the fly nut at the lesser, aggrandize the legs, and so retighten the wing nut.
- Place the seat on meridian and secure it to thepeak aligning rod using the wing nut located underneath the seat.
- Raise or lower the seat by adjusting theheight adjustment rod until you detect a comfortable sitting position.
When setting up your drum throne, brand certain the throne's legs are broad plenty to exist stable, and that one of the legs is pointed behind you. Doing this will assistance prevent yous from falling backward.

Pulsate throne diagram. Click to enlarge.
Snare drum stand
The snare stand is defended to your snare pulsate. It uses what's called thebasket to secure the pulsate to the stand up. Some drummers also use it for rack toms. The setup of a snare pulsate stand up is similar to that of a drum throne, except it can also be adjusted to bending the pulsate. While it'due south recommended to have the snare drum level with your hips, you want to position it so yous can play the drum comfortably and consistently without getting fatigued. Follow these steps to get the snare drum stand up set.
- Loosen the wing nut at the bottom to expand the legs and then tighten information technology support.
- Loosen the heart wing nut and adjust the height of the stand up. Tighten it back up once y'all find the desired tiptop.
- Once the stand is in place, open thehandbasket, gear up the pulsate in, and utilize thehandbasket'due south adjustment nut to secure the snare drum.
- Conform the bending of the snarebasket by loosening the fly nut at the articulation. In one case you lot find the drum angle that feels most comfortable for your playing, tighten the joint's fly nut.

Snare pulsate stand diagram. Click to enlarge.
Cymbal stands
Most drum sets include a hardware pack which includes a hi-hat stand and at least one crash cymbal stand up. These stands tin can be either straight, boom, or conversion stands, but they all serve the same purpose. You'll dial in the positioning of the stands and cymbals at the end of this article, so follow these steps kickoff to gear up them up.
Hi-chapeau stand
- Loosen the bottom wing nut and expand the legs. Once the stand is stable, tighten it support.
- On the bottom of the pedal, insert the two hi-hat foot pedal brackets into the two holes located at the center base of the stand.
- Screw thepull rod (the skinny rod with threading) into the stand up and insert thetube assembly over it. Position the tube to the desired pinnacle, then place the felt onto the hi-chapeau seat.
Straight cymbal stand
- Loosen the bottom fly nut and expand the legs. In one case the stand is stable, tighten information technology back up.
- Side by side, utilize the center fly nut to adjust the acme of the stand up itself.
- Conform the wingnut closest to the lesser cymbal felt to change the bending of the cymbal until it feels comfortable to yous while playing.
Blast and convertible stands
These stands volition exist assembled in the aforementioned mode as a straight stand up just with a few actress steps.
- Boom stands have an arm that yous can extend for more precise cymbal placement. The arm bending and length are adjusted with the wing nut at the top of the stand up, and the cymbal bending is adjusted with the wingnut closest to the cymbal felts. You will generally meet these stands used for ride cymbals, but depending on the manner yous like your drum setup, y'all can utilize them for other cymbals every bit well.
- Convertible stands tin be used equally either straight or blast stand and have a hidden boom arm inside the upper tube. For detailed instructions, check out our guide about how to assemble convertible cymbal stands!
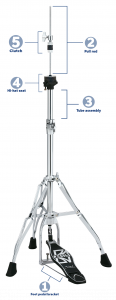
Hello-hat stand diagram. Click to enlarge.
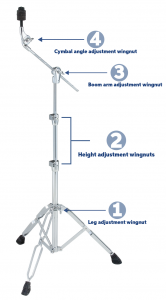
Smash stand diagram. Click to enlarge.
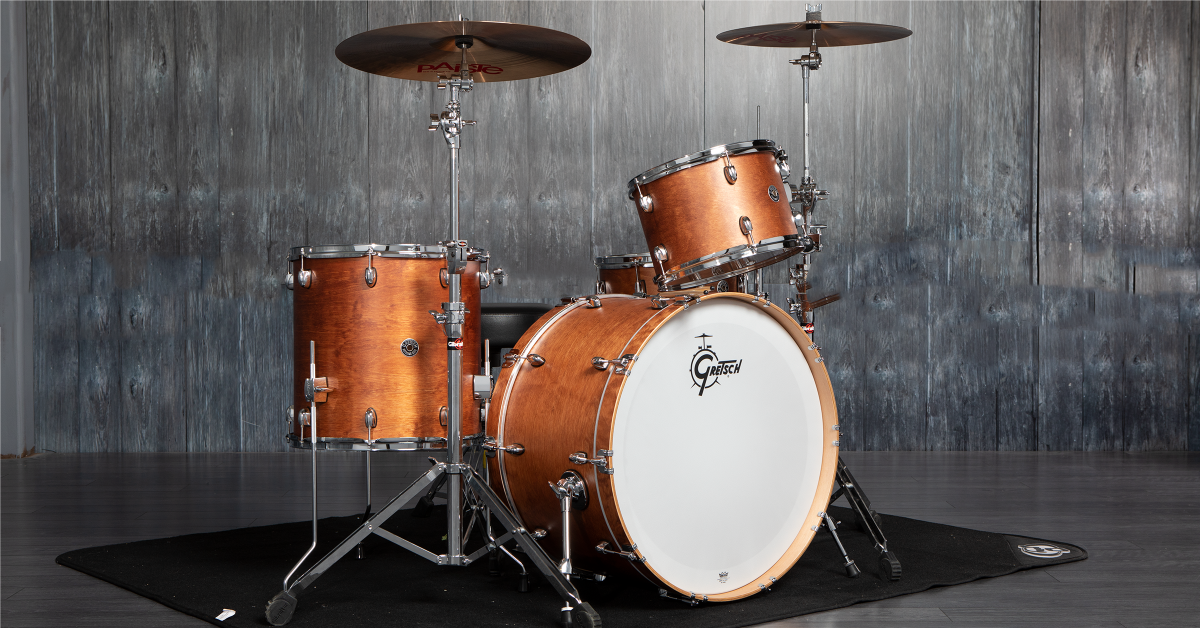
Once the heads are installed, and your hardware is set upwardly, the side by side step is to fix the drum shells. It's all-time to set them upward while you sit on your throne behind your bass drum considering that gives you an idea of how everything volition look once you finish. You tin configure the drums any style you'd like, simply the most common setup to get you started is to have the snare between your legs, the small rack tom on the left tom arm, the larger rack tom on the correct tom arm, and the floor tom to the right, at the same height as your snare drum. Once more, this is a general guideline; set up them up in the way they feel most comfy to you.
- Place the bass pulsate on the floor with the logo head and bass drum legs facing abroad from you.
- Loosen the top fly nut on the bass drum legs so they swing out, and tighten them down with the legs at a slight outward bending. Loosen the bottom wing nut and extend the leg until information technology reaches the flooring.
- Once the legs are gear up to the desired position, tighten everything upward and adhere your bass drum pedal to the hoop. To protect your bass drum hoop from being chewed up by your pedal, use a hoop protector.
- Identify the snare drum into the snare standhandbasket and tighten it using the handbasket's adjustment nut.
- Adjust the top of the snare stand up to where it feels about comfortable while you play.
- Insert the floor tom legs in theflooring tom brackets and tighten them downwardly with the fly nut on the bracket.
- Brand certain that the feet are facing outward then the flooring tom doesn't tip over.
- Keep the height and angle the same as the snare drum. This makes it a lot easier when yous're switching between the two.
- Insert the long part of the tom arm into the bass drum bracket and tighten the subclass'south wing nut.
- Slide the rack tom, via the bracket on the side, onto the tom arm and tighten it down. Remember, the modest rack tom is placed on the left and the big rack tom is placed on the correct.
- Angle the rack toms a picayune so they're facing toward you. Not merely will this make information technology easier to hit the pulsate, just it will also make playing more comfortable and less tedious.
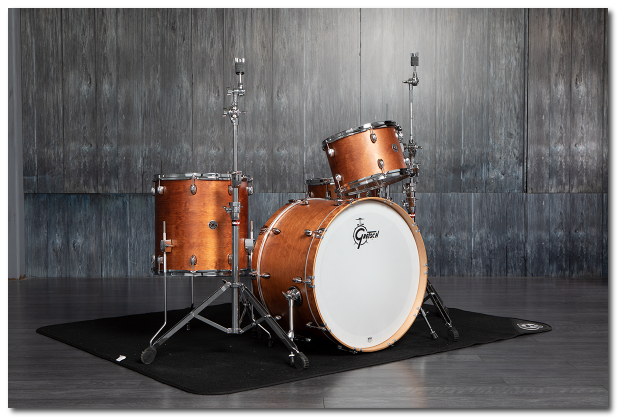
Setting up pulsate shells.
The final step in assembling your drum ready is to set the cymbals by placing them on the cymbal stands. When setting upwards your cymbals, make sure you accept cymbal sleeves and felts on the stands to prevent any metallic-on-metal contact! One time the cymbals are tightened down, adjust the angle and height to where they feel most comfortable to you, then movement them into position.
- Lay the bottom hi-hat cymbal on peak of the big felt of your hi-hat stand with the bell facing down. Nearly hullo-hat cymbals will have "Top" and "Bottom" marked on them, only if they don't, use the thicker cymbal every bit the bottom.
- Remove the bottom clutch nut and i of the felts as seen in the photograph beneath.
- Place the clutch through the top hello-lid cymbal and so you lot have the top felt resting on the bell.
- Place the bottom felt on, then retighten the clutch nut.
- Slide the clutch onto the pull rod and tighten the clutch's wing nut.
Crash and ride cymbals
- Lay the cymbal on top of the bottom felt of your stand with the bell facing up.
- Identify the other felt on top of the bong, then tighten the wing nut a little bit until the cymbal is secured.
The location of a crack tells a lot about how it was ready and played, and there are several uncomplicated yet effective steps you can take when setting up your cymbals to prevent damage.
- Angle the cymbal a little bit toward you, and make sure that y'all take a cymbal sleeve on the stand! Metal-on-metal contact tin can cause cracks effectually the bong.
- Make sure the cymbal can motion freely when you place the wing nut on. If the cymbal is tightened down too much, it tin't blot every bit much stupor, which can cause stress fractures.

Setting up the cymbals.
Positioning the cymbal stands
TIP:If y'all're playing on hard floors, such every bit wood or concrete, we recommend using a drum rug. This prevents your stands and pulsate set from sliding around and keeps everything in place. Once the stands and drums are set up, consider using gaffer record on your drum carpeting to mark the placement of your drums and hardware. This step will speed up the setup process in the future!
- Adjust the height and angle to the near comfortable playing position past using the stand'due south aligning wingnuts that you worked with while setting up the stand up.
- Move the stand into playing position and double-check that the stand's leg base of operations is wide plenty.
- Place i of the stand'due south legs nether the cymbal, especially if you lot're using a boom stand. This will assistance counterbalance the weight of the cymbal and the weight of the stand.
Now that you've fix your first drum set, accept some time to arrange everything to your liking. There is an infinite number of possibilities when setting upward and tuning your drums, just here are a few takeaways to think well-nigh:
- Drums are musical instruments, too! Not simply are they the foundation of the rhythm and groove of a song, just they can also really complement what'southward being played, so listen to some of your favorite bands and genres when tuning your drums to become the audio y'all're looking for.
- Get creative with how you set your kit up. Some drummers like to have their cymbals high and the drums angled toward them, while others prefer to go on the drums low and flat with the cymbals closer to them. Remember, it's all about what feels comfy to you.
- Accept care of your drum set, and information technology will take care of you lot. Just like a auto, drums and cymbals need basic maintenance to extend their life. Simply wiping down and polishing your shells and cymbals, lightly spraying lubricant on your tension rods when changing drumheads, and fifty-fifty storing the drums in a controlled environment can really go a long way!
Related Articles
When you need help, Sweetwater has the answers!
Our knowledge base contains over 28,000 expertly written tech articles that volition give y'all answers and aid y'all get the about out of your gear. Our pro musicians and gear experts update content daily to continue you informed and on your way. Best of all, information technology'south totally Gratis, and information technology'southward only another reason that you become more than at Sweetwater.com.

Source: https://www.sweetwater.com/sweetcare/articles/how-to-set-up-a-drum-kit/
0 Response to "How To Set A Drum Set"
Post a Comment